To avoid any misunderstanding from the title, I didn't buy these things at the end of the summer, rather, I'm posting this haul at the end of the summer. It was a bit a race against time the moment I realized that the last day of summer was today, therefore I had about three days to lay this blog post instead of a few more weeks.
31 Sons de mode striped top マルチボーダーロールカラープルオーバー
I learned about this brand when I saw a wear.jp user wearing the top with a skirt from Fi.n.t, and I thought it was such a nice outfit. I've been wanting to get the exact same outfit ever since—unoriginal I know, but both pieces look so lovely together. I spotted the Fi.n.t skirt a few times on Fril, but never bought it. As for the striped top, despite my regular searches for it, I never saw it pop in the results. My unlucky search went on for several months. I seemed to favour finding the top first and then take care of the skirt later, I'm not sure why.
When I recognized the top in a Mercari listing for a fair price, I bought it directly (with Japonica Market). I mostly wanted it because I liked how it looked with the Fi.n.t skirt, but the top itself is certainly nice too. I like its V-shape collar. It looks a bit sailor-looking but without the traditional square collar at the back which I prefer.
This top is so comfortable and softer than I thought. I was also impressed at the seemingly perfect condition given its low price. Only thing is that it tends to roll up a bit at the waist, but I'm being really picky.
Twik white/ivory cable cardigan
I went to Simons a few weeks ago with my mom, notably looking for a cardigan for the colder days. I tried a couple, but there were none I liked. At this time of the year, there were mostly oversized knit cardigans which weren't the style I was going for. I wanted something more delicate with a cable pattern. (I guess that I would've had more chances of finding such a piece in spring.)
I noticed a cardigan on the wall and decided to try it. I was wearing my purple flowers dress and the whole outfit instantly looked more put-together with the cardigan on. It's a shorter cardigan which means that it fits perfectly with my dresses and my high-waisted skirts.
Obviously, the price of the cardigan was much higher than what I usually spend on a cardigan—as it's almost always the case for every piece of clothing that I come to like. But my mom insisted on buying it for me as a present. It's so rare that I find something that is the perfect look, the perfect colour and the perfect fit, so I'm very thankful. 💖
This colour looks good with basically anything too.
1950s Betty Barclay white crochet dress
While I was browsing vintage dresses on eBay, I spotted a white dress that had crochet all around the skirt. The fabric looked quite thick and waffle-y, and with the crochet, I knew that I wouldn't be able to make this kind of dress myself. Furthermore, it was my size.
The seller only stated "Very nice vintage condition" and the display pictures weren't clear enough to properly examine the state of the dress. I could see some faint yellow at the top of the zipper on the inside, but I wasn't sure of anything because of the lighting and the quality of the pictures. Also, the brand tag looked pretty good so I was maybe imagining flaws.
I know the best would've been to ask the seller to provide more details on the condition, but I always get uncomfortable asking this question because I worry that the seller will get on the defensive? Anyway, I bought the dress expecting it to have minor yellowing here and there that could be washed off.
The dress arrived and I was shook at the major yellowing.
The camera doesn't make it look that bad, but there was strong yellowing everywhere
on the inside of the bodice, especially where the underarms and shoulder blades are.
The yellow was even visible on the outside at the shoulder blades. The dress felt a bit disgusting to hold. As someone who sells secondhand clothes (on Depop), yellowing is definitely something you should precise on the item listing. And adding one or two pictures won't hurt. But just the mention itself takes 15 seconds to write and prevents the buyer from a bad surprise upon receiving their stuff.
My mom soaked and washed the dress two times in the washing machine with detergent and bleach at a delicate cycle. She didn't put the dress in a mesh laundry bag because clothes tend to "roll" in a ball and she wanted to make sure that the dress would soak thoroughly in the bleach. The dress was air-dried.
Fortunately, two good washes were sufficient to remove all of the yellowing. (Maybe there's some left, but I really can't see it.) It was such a relief. I find myself lucky because we definitely weren't sure if all the yellowing would go away.
The dress in all its splendour
White piping at the waist
Close up of the beautiful crochet.
I don't know why, but it reminds me of a doily which gives me English/Victorian vibes.
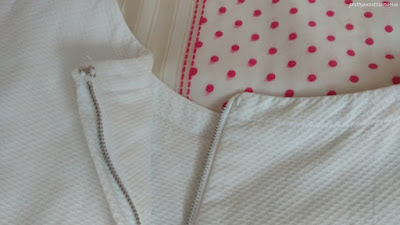
There's a hook-and-eye closure at the top of the zipper and also at the waist.
Yes, the zipper is at the back and it's frickin hard to zip it up. (I also can't fasten both hook-and-eye closures by myself.) I know I mentioned in a past blog post my strong dislike towards back zippers, but it's not like I had the choice here. Moreover, I think that I hadn't discovered yet my hatred for them when I bought the dress.
I'd need a petticoat underneath to show off the crochet better. It's way too pretty.
Each side of the bust darts has those kinds of weird loose folds.
I don't really like it, but it's not the end of the world.
Despite the yellowing that the seller could've mentioned, the dress is indeed in "very nice vintage condition". There aren't any holes or stains. The crochet is impeccable (except in some microscopic places but that is just unavoidable). It's a very beautiful dress. 💖 Now that I've made the first move, I've been so tempted to buy other vintage dresses.
Slips (3)
Ever since I made my mom cut the lace trim of a skirt slip to beautify the hem of a dress, I regretted "wasting" that slip. I had therefore been looking for a replacement for what it seemed like forever, and I finally found three at Value Village.
(Note: My mom tightened slips #2 and #3 because their waist were a bit loose.)
Slip #1
It looks ordinary but...
... there are cute flirty slits on both sides...
... and all edges are scalloped ✨ Plus, the condition is like new.
Slip #2
This one is a bit more see-through.
I got it because I liked the lace trim and could alternate wearing it with the previous one.
Cute detailing on the elasticized waist

Close up of the lace trim
Slip #3
With two slips I had plenty of slips by then—even one was already enough.
But I couldn't let this white one hanging on the rack.
I really like these dainty elasticized waists.
Three layers of lace trim ♥
White block heel pumps
I found these white shoes at Verona while looking for nude ones. I wasn't specifically looking for white pumps at that moment, but I knew that I wanted to own a pair someday. I had seen them in vintage snaps and thought they looked dashing paired with a white or pastel dress.
I very rarely buy shoes on a whim, but I immediately liked their look on my feet and knew that I wouldn't find better online or elsewhere in-store.
I wore them one time and they walk great. I also wore them in my try-on pictures with my dress Simplicity 4270 and I'm so glad I got them. They'll need the usual breakage but I'm not worried. They're even a little loose, so I wear gel half soles in them.
Nude block heel pumps
I had been looking for low-heel pumps that would look classier, but that I could still wear on a daily basis to run errands and go to work—basically a new main pair of shoes to replace my Anne Klein black flats that look a bit bulky at the heel. I absolutely love my black velvet Mary Janes and initially chose them as substitute, but I wore them one afternoon to go shopping and my feet/toes hurt so bad. The pain lasted for a couple of days even if I had walked for a few hours only. They're definitely still too tight and I'm unsure if I'll ever be able to wear them for longer periods...
Because I had black pumps in mind, I started to look for black pumps with a bow on top, regardless of whether their tip would be round or pointy. This was around the beginning of summer. But gradually— and I guess that vintage magazines influenced me—I started to drift towards plain nude pointed-toe pumps. I always found they were too mature for my style and too extra for work, but I put these feelings aside and thought I should at least try a pair to see how it looked.
My mom and I went into different stores and I was pretty confident I'd find what I was looking for since it wasn't too out-of-the-box. I eventually found my perfect pair at Naturalizer. I had never bought there because the shoes were never my style, but we decided to go take a look just in case.
The colour goes perfectly with my skin tone, the heels are just the right height and the shoes are very comfortable. They make the perfect shoes for everyday wear while still giving an elegant feel to my outfits.
Love the almond shape, not too pointy.
I didn't even know there was an in-between between round and pointed-toe shoes.
We've come to the end of my haul, coinciding with the end of this year's summer. I'm not sure if I'll be posting other blog posts for now. I do have another haul planned and do enjoy making dresses (I started another one that is a WIP right now), but I really need to focus more on "serious" stuff. I enrolled myself in an online program (after graduating two years ago) and I'm already late with my assignments in all three classes. Lol.


