Thursday, August 27, 2015

Changed Blog Design, Language Switch, Blog Name etc.

Hello,

A couple of weeks ago, I started writing my articles in English rather than in French. I really enjoyed writing in French because it's my first language, but a switch was necessary. Nearly every blog I am subscribed to is written in English, and I feel it can be easier to access my blog if it's not written in French.

Anyway, today, it was the finalization of a new blog design. I had started yesterday to draw a couple of doodles and do the header, and I think it's now finished. Not perfect but I like it!

Here's how my blog looked like:


I kept this blog 'design' for about two years... I liked its simplicity, but it was time for a change.

Of course, I did not do everything by myself when making the new design (well, except for the drawings I guess).
First, I just googled something like 'how to make your own blog design blogspot' and stumbled upon this page.
The author of the blog makes lovely designs, and I really liked the style showed in her tutorial. On top of that, everything seemed to be well explained. So I decided why not jump into it. :D

I started by drawings some cute stuffs on Paint, and make my cookie header and borders on Gimp 2.
After, I followed the steps in the tutorial to assemble everything into a blog design.

Sounds pretty simple like that, but it actually took me a whole day and a half, especially because the little drawings took me quite a while (and I had no idea what to do), and dealing with the CSS part was kinda difficult and long.. (a lot of trial and error) but all in all, I made it through hehe.

One problem I had that I still haven't found a solution though is moving the whole article text more to the right..

This is the bottom part of the article, but everything higher is the same.

But I did find a solution on a website where they told us to add a column on the left, so I added one (now I have one column on the left and one on the right (but the one on the right was always there)).
Even though it's not perfect, it's still better than having the text over the left border!

I am still not yet finished with this blog's design, as I want to add other cute pastries all along the top header. I also want to do a background for the blog. Although, this will be done another time.
For now, I am quite happy with how my blog looks, and I thank Blog Designs by Dani for all the help making this design.

Byebye!
* ­¯`~-._.-~` ­¯*¯`~-._.-~` ­¯*¯`~-._.-~` ­¯*
Update 2015.08.30
Looks like this design is not really optimized for the mobile version of Blogger, sorry!


Besides leaving it as it is, you can always click on
'View web version' at the bottom if you believe your mobile will handle it:

Tuesday, August 4, 2015

Bling My Flip Phone (part 3 of 3)

You can see 'Bling My Flip Phone (part 2 of 3)' here
and 'Bling My Flip Phone (part 1 of 3) here.

Hello!

Finally, the final part of 'Bling My Flip Phone' has arrived.

I added the last stuffs the day before yesterday and yesterday.

Day 5: Silver chain

After looking into necklaces for chains, I found one that had an adjustable chain, so I just cut that little part off and stuck it to its respective place on the phone.


I wouldn't say the result is striking, but I prefer the silver chain to the gold one a lot. And as expected, the chain covers the transparent gems without hiding them completely, which gives a nice effect.
After, I stuck different sizes of different colored gems in the heart contour screen. I forgot to take a picture of the result, unfortunately, but you will see it in the next pictures. They don't shine a lot.. but they don't look that bad, and it looks great when the phone has its little front lights turned on.
I also found that the Hello Kitty face was starting to look greyer and even yellow in some lightings, which was definitely an issue that had to be taken care of.

Day 6: Finishing touches...!!

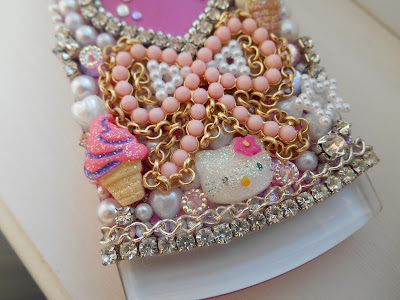
Yesterday, because that Hello Kitty was annoying me, I bought some white glitters. I thought that not only would it make the Hello Kitty shinier, but it would also hide a bit of its grey color.
I also decided to put some glitters on the gems in the heart, on the two little heart charms on top, and tried on the gold chain around the bow (the last one was a fail, and I ended up removing as well as I could the nail polish and glitters stuck on)..
After waiting a little bit, I just slightly blew on the glitters and dusted them with a small brush.


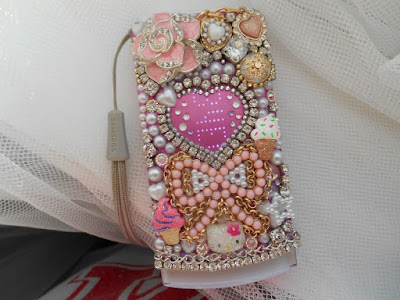
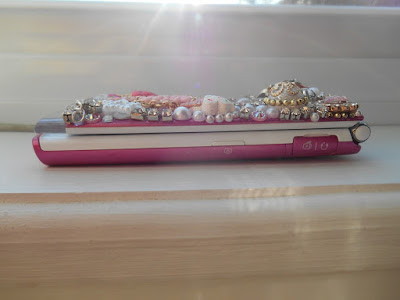
And... my phone was done...!!


”decoden-phone-case”/
With the front lights on

”decoden-phone-case”/
Kinda went overboard with the glitters on that Hello Kitty..
As I tried to remove some excess on its right eye, I removed some black. :(


”decoden-phone-case”/

”decoden-phone-case”/

”decoden-phone-case”/

”decoden-phone-case”/

”decoden-phone-case”/
With the flash

”decoden-phone-case”/
Still have a long way to go before that phone is 100% completed...

Concerning the back of the phone, I have no idea what to do (yet). Only thing I know is I want the phone to stay flat on that side, so I do not want to put 3D stuffs on the back. But I will probably not start working on that part any time soon, and when I do, I shall post some pictures here!

- - -

To conclude this journey (separated in three parts total), I wanted to say that I am overall very satisfied of the outcome of this bling phone (but not perfectly).
As I said it in part 1, I always failed trying to bling something before, ending up disliking it after. But this time, I am proud to say I love my phone much more than before blinging it! I do not regret it at all.
Even though this is definitely not a budget savvy bling phone, I love it, and that thought will certainly make me take care more of it. Furthermore, that phone has a truly unique look.

Thank you for reading!
Byebye~